With the digital-first generation, your freelance portfolio isn’t just a list of past projects—it’s your personal brand. You’re a designer, a videographer, an animator, a writer, or a digital marketer—whatever your skill, highlighting your skill in a great portfolio video can help you stand out among a sea of online resumes and PDFs. It provides potential clients with a fast, professional, and engaging glimpse of your style, talent, and professionalism. If you’re not comfortable recording your voice, CapCut supports text to speech functionality, which allows you to narrate your video using natural-sounding, AI-generated voiceovers that can still match your tone and professionalism.
CapCut Desktop Video Editor is one of the best video editors, and you can create an amazing portfolio video by using this amazing app. In this article, we will explain step by step how to create portfolio videos as a freelancer with CapCut Desktop Video Editor.
Why A Portfolio Video is A Freelancer’s Best Friend
Static portfolios are still powerful, but in an age of ephemeral attention and internet competition, video offers the chance to tell your story in a personal and enduring manner. Instead of merely showing your work, you can take potential clients through your process, highlight successful outcomes, and reveal your personality. A portfolio video also offers the chance to organize your work into a living, branded presentation that plays on channels, from your site through to LinkedIn, Behance, or even Instagram. It’s your digital handshake: short, potent, and designed to make exactly what you need people to remember about your work. If you’re creating multiple client showcases and want a head start, using an AI video generator beforehand can help draft a first version of your structure, which you can then refine and personalize with CapCut’s tools.
Step 1: Gather Your Properties and Lay the Base
Before you even open CapCut, take a bit of time to gather and sort out the content you will be using for your video. This could be finished project samples, client logos, screenshots of your work in progress, a testimonial video, behind-the-scenes images, and even a personal intro. With all of that in hand, open up CapCut Desktop and start a new project. Bring your files into the media library and start working on a rough outline for the timeline.
Usually, a solid portfolio video will have a brief intro (who you are and what you do), followed by a montage of project highlights, and finish with a call-to-action or contact information.
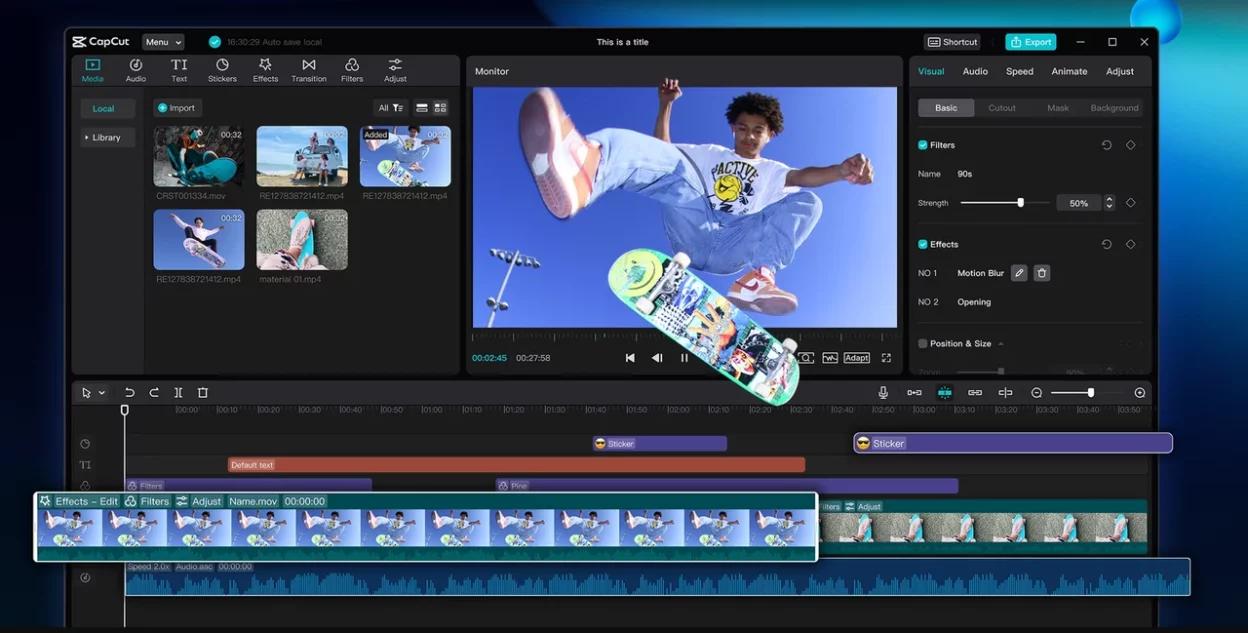
Step 2: Trim and Set Up for Flow and Clarity
Once your timeline is set, it’s time to create your rhythm and clarity of your video. Trim out unnecessary pauses, excess footage, or visual noise using CapCut’s trimming features. Consider pacing—too slow, your viewer will be bored; too fast, they’ll miss the value of your work. Organize clips to provide a cohesive narrative: demonstrate a problem, then the solution you provided; demonstrate the start of a project, then the end result.
You can layer media in CapCut, so if you’re demonstrating a design mock-up, for example, you can layer a time-lapse of your design process or include text descriptions to provide context. Vary your visuals as much as possible—cut between media types (video, screenshots, testimonials) and shift angles or styles where you can. This process is all about making your message clear and compelling through deliberate sequencing.
Step 3: Add Text Overlays, Titles, and Personal Branding
After your video has structure and pacing, the next step is adding the branding and text elements that give your work a personal touch. Begin by creating a title card with your name, job title, and tagline, if applicable. Utilize the fonts available on CapCut or upload your own to be in line with your branding. Throughout your video, insert short, punchy text overlays that introduce each piece or explain what the viewer is looking at, like “UI/UX Design for Mobile App – Client: XYZ” or “Logo Animation for Startup Campaign.”
Keep your words brief and professional, with smooth transitions and readable font sizes. You should insert your logo, website, or social media handle at the beginning or end of the video, or both. CapCut has convenient placement for these assets, and you can even utilize the motion presets available if you’d like to animate your logo or text. This solidifies your branding and leaves people with a great impression of you.
Step 4: Include Music, Voiceover, and Sound Design
Audio sets the tone for your video. If you’re using a voiceover to tell the viewer, CapCut lets you record in-app or upload pre-recorded voiceovers. Make sure your voice is clear, well-paced, and on-brand. If you’re feeling shy or want to experiment with different tones, CapCut’s voice changer lets you alter vocal recordings to better match your style—great for everything from corporate seriousness to creative flair.
If you’d rather let visuals speak for themselves, choose a background music track that complements the mood without overpowering your work. CapCut comes with a library of royalty-free music, or you can upload your own.
Make sure volume levels are balanced so your audio doesn’t conflict with any dialogue. You can also use CapCut’s keyframe tool to fade out/mute music or add subtle sound design to dramatic moments. For example, a soft click or swoosh can make transitions sound more professional. Keep it professional—don’t use overly dramatic or loud sound design unless it’s your personal brand.
Step 5: Final Check, Fine-Tune, Export with Professionalism
With your video nearly complete, now is the time to have a close eye over all. Play the full video a few times—first to test visual continuity, then audio balance, then with fresh eyes to catch typos or mismatched elements. CapCut’s playback mode allows you to scrub quickly through the timeline and adjust things exactly. Double-check that your transitions are smooth, your fades are tidy, and your branding is consistent. Once satisfied, go to export settings.
CapCut allows you to choose resolution (1080p is best for most pro portfolios), aspect ratio (landscape for websites or YouTube, vertical for mobile environments), and bitrate. Export high-quality versions for your main environments, but don’t forget to make shorter cut-downs suitable for social platforms. Save your project file for future reference, should you want to update or re-use it later. You now have a gleaming, professional portfolio video you can share proudly—and that speaks for you when you’re not in the room.
Final Thoughts
Your portfolio video is not just a reel—it’s your digital elevator pitch. It’s how you introduce potential clients not only to what you do, but also how you think, make, and problem-solve. With CapCut Desktop, freelancers now have an affordable, yet powerful tool that enables them to make professional-looking, compelling videos without the high learning curve of pro software.

Lexy Summer is a talented writer with a deep passion for the art of language and storytelling. With a background in editing and content creation, Lexy has honed her skills in crafting clear, engaging, and grammatically flawless writing.